
NTLMv2 Single Sign On configuration with Liferay Portal
Introduction
The purpose of this document is to explain how to integrate NTLM Single Sign-On (SSO) into the Liferay Portal that works for NTLMv1 and NTLMv2. Lets first understand what is NTLMv1 and NTLMv2. In very simple words NTLMv1 is supported by Windows XP / Windows 2003 and older version of windows. NTLMv2 is supported by Windows Vista/ Windows 7/ Windows 2008 and higher version for improved security. Liferay Portal till 5.2.x was not supporting NTLMv2. Now they have developed a patch for that works with both NTLMv1 and NTLMv2. This article explains how to integrate NTLM SSO and Microsoft Active Directory Single or Multiple Domain with Liferay Portal.
Overview
In large enterprises, they have multiple organizations distributed in various locations throughout the globe. For small enterprise assume they have only one location. Some of the enterprises use Microsoft Active Directory to manage user’s security and used to application authentication. Large organizations use multiple LDAP domains and small organization use single LDAP domain. Following section in the article shows how anyone can configure NTLM SSO with Single or Multiple Domain Controllers.
Issue with Current Liferay without NTLMv2 Patch:
- NTLMv1 current implementation of Liferay NTLM SSO is having limitation. Please find following limitations
1. After configuring NTLM SSO v1, user is not able to login to Liferay Portal if they are using Windows Vista / Windows 7/ Windows 2008. User will be prompted for the windows dialog box to enter credentials and even if user enters correct credentials it is not allowing user to login. Reason behind that is all latest windows uses NTLMv2 protocol and Liferay supports only NTLMv1. Workaround for this is change the security setting from My Computer > control panel > Administrative Tools > Local Security Policy > Local Policies > Security Options ( Figure 1)
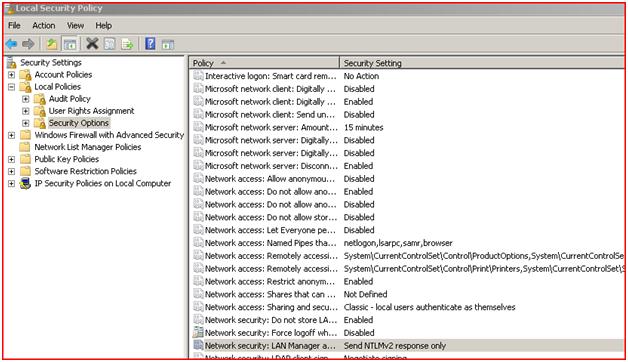
Figure 1 : Local Security Policy
Look for Network security: current value “Send NTLMv2 Response Only”. Change this value to “Send LM & NTLM Responces” ( Figure 2)
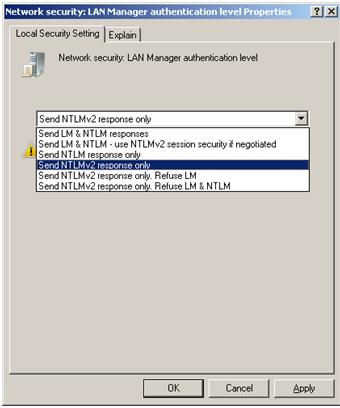
Figure 2 Network Security
2. The above change needs to be done on all users’ computer, and assume if in company if there are 10000 users then? It will be difficult to change all the computer setting.
- To resolve above issue, NTLMv2Filter is implemented and that supports NTLMv1 and NTLMv2.
- To configure NTLMv2Filter, find following details.
I have tried to cover all the possible details to successfully configure NTLMv2 with Liferay Portal. Correctly this implementation is used by Daiichi Sankyo ( www.dsi.com ) configured by CIGNEX.
How to configure Single Domain for NTLM SSO in Liferay Portal?
Find following steps to configure Single LDAP and Single Domain Controller for NTLM SSO
It is assumes that following information you have available.
- LDAP Server Information
- Computer Account information for NTLM SSO
- Latest Patch with NTLMv2Filter or Latest Liferay bundle which has NTLMv2Filter (http://issues.liferay.com/browse/LPS-7998)
LDAP Server Information:
Note: if you don’t have the following information, contact organization IT team who manages AD and get all information
Organization Name: CIGNEX Domain Controller Name: CCA LDAP Server Host Name: AD01 AD Server with default port 389: ldap.base.provider.url=ldap://AD01.cca.cignex.com:389 Base DN: ldap.base.dn=DC=CCA,DC=cignex,DC=com AD Admin User - if you want to sync AD with Portal changes then user should have all rights including read/update, if you are using just for read only purpose and don’t want to make changes to AD then make sure that User has Read Only Rights) - in following property CCA is domain controller name and ccaadmin is admin user ldap.security.principal=cca\ccaadmin ldap.security.credentials=abcd-1234 |
Computer Account Information
If you don’t have Computer Account please follow following steps to create a computer account in AD.
Step 1: Create the Service Account for NETLOGON Communication
- To use the NTLM security provider as an authentication service you will need to create a service account in Active Directory with a specific password.
- To create the service account, the Active Directory Users and Computers (ADUC) utility may be used. The NETLOGON service requires that this account be a Computer account (a User account will not work). We recommend that you use the same value for both the "Computer name" (cn) and "pre-Windows 2000 name" (sAMAccountName) and use only letters, digits and possibly underscores (do not use spaces). This name will be part of the service.acctname property described in the NtlmSecurityProvider Properties section.
- Also determine and note the service account "distinguished name" (DN) for setting the password in the next step. The DN can usually be derived from the account name and domain. For example if the service account name CIGNEXCMS1 is in the Active Directory domain cignex.com, the DN might be: CN=CIGNEXCMS1,CN=Computers,DC=CCA,DC=cignex,DC=com. If you are still not sure about what the DN is, the ADSI Edit MMC Snap-In will show you directory entries by DN.
Step 2: Set the Service Account Password
- The service account password must be supplied to Liferay Portal
- Currently we are unaware of a standard MS utility that can be used to set passwords on Computer accounts. Therefore, the following VBScript is used to set the password on a Computer account.
- Copy Paste following VB Script code in file called “'SetComputerPass.vbs
'SetComputerPass.vbs
Option Explicit
Dim strDn, objPassword, strPassword, objComputer
If WScript.arguments.count <> 1 Then
WScript.Echo "Usage: SetComputerPass.vbs <ComputerDN>"
WScript.Quit
End If
strDn = WScript.arguments.item(0)
Set objPassword = CreateObject("ScriptPW.Password")
WScript.StdOut.Write "Password:"
strPassword = objPassword.GetPassword()
Set objComputer = GetObject("LDAP://" & strDn)
objComputer.SetPassword strPassword
WScript.Echo
WScript.Echo "Password set on " & strDn
WScript.Quit
Note: This script should also work remotely from another workstation provided it is executed with sufficient credentials.
- Execute script on the Domain Controller for example “AD01.cca.cignex.com”
- The following command-line dialog using the above SetComputerPass.vbs illustrates how to set the password for the service account CN=CIGNEXCMS1,CN=Computers,DC=CCA,DC=cignex,DC=com
C:\>cscript SetComputerPass.vbs CN=CIGNEXCMS1,CN=Computers,DC=CCA,DC=cignex,DC=com
Password: **********
Note: You will need to be logged in as an Administrator to run the above command. DO NOT use same password ad Computer Account Name and it should match AD Password Policy
- Use a long and random password and make a note of it. And later it will be configured in portal-ext.properties
- In this case, open SetComputerPass.vbs with notepad and just temporarily hard-code the password by commenting out the three lines that collect the password (a ' is a comment in VBScript) and set it manually like following and try to run the command again
'Set objPassword = CreateObject("ScriptPW.Password")
'WScript.StdOut.Write "Password:"
'strPassword = objPassword.GetPassword()
strPassword = "ALongRandomPassword"
Note: Unlike User accounts, Computer account passwords do not expire. Domain security policy is frequently used to instruct Windows installations to periodically reset their own passwords however in practice these accounts are not denied access if they do not (such as because they were turned off for several months).
Configuration in Liferay Portal for NTLM SSO
- LDAP Server needs to be configured using Control Panel. Follow steps mention be bellow article http://www.liferay.com/community/wiki/-/wiki/Main/Integration+with+NTLM+plus+ADS
- If Liferay bundle doesn’t contain NTLMv2Filer then you need latest Liferay patch (http://issues.liferay.com/browse/LPS-7998). If you have Liferay bundle which has the NTLMv2Filter then you can configure following properties in portal-ext.properties file and Web.xml
- Portal-ext.properties
ntlm.auth.enabled=true
ntlm.auth.domain=CCA
ntlm.auth.domain.controller=192.168.23.60 #IP of AD01 or Domain Controller server
ntlm.auth.domain.controller.name=AD01
ntlm.auth.service.account=CIGNEXCMS1$@CCA.cignex.com
ntlm.auth.service.password=abcdef-12345
- Web.xml
Make sure that replace NTLM SSO Filter and do not change the filter order in Web.xml
<filter>
<filter-name>SSO Ntlm Filter</filter-name>
<filter-class>
com.liferay.portal.servlet.filters.sso.ntlm.Ntlmv2Filter
</filter-class>
</filter>
<filter-mapping>
<filter-name>SSO Ntlm Filter</filter-name>
<url-pattern>/c/portal/login</url-pattern>
</filter-mapping>
Note : default filter-mapping values is “/c/portal/login”. But if you need that any time user make request then first user needs to be authenticated if not authenticated then changed value like “/*”. And you need to do minor customization in NTLMv2Filter replace following line.
if ((path != null) && path.endsWith("/login"))
with
if (path != null)
You are almost done!! Start Application server and click on Sign In link from Dock Menu to login to Liferay Portal.
How to configure Multiple Domains for NTLM SSO in Liferay Portal?
This looks complex but this is very simple.
- Configure Multiple LDAP Server using control panel
- Make sure that all Domain Controller are trusted and configure main domain controller as shown in Single Domain NTLM SSO Configuration
Example :
Assume there are three Domain controllers
US
AD Server with default port 389:
ldap.base.provider.url=ldap://AD01.cca.cignex.com:389
Base DN:
ldap.base.dn=DC=CCA,DC=cignex,DC=com
AD Admin User
- in following property CCA is domain controller name and ccaadmin is admin user
ldap.security.principal=cca\ccaadmin
ldap.security.credentials=abcd-1234
UK
AD Server with default port 389:
ldap.base.provider.url=ldap://UKAD01.cca.cignex.com:389
Base DN:
ldap.base.dn=DC=CUK,DC=cignex,DC=com
AD Admin User
- in following property CCA is domain controller name and ccaadmin is admin user
ldap.security.principal=cca\cukadmin
ldap.security.credentials=abcd-1234
India
AD Server with default port 389:
ldap.base.provider.url=ldap://INDIAAD01.cca.cignex.com:389
Base DN:
ldap.base.dn=DC=CINDIA,DC=cignex,DC=com
AD Admin User
- in following property CCA is domain controller name and ccaadmin is admin user
ldap.security.principal=cca\cindiaadmin
ldap.security.credentials=abcd-1234
As shown in above example there are three Domains CCA, CUK, CINDIA make sure that all Domain Controller are trusted with each other, and you can configure only one Domain Controller in portal-ext.propertis as explained above and configure web.xml as above.
You are almost done!! Start Application server and click on Sign In link from Dock Menu to login to Liferay Portal.
- By
Mitesh Panchal
Solution Architect at CIGNEX Technology Inc. NJ
